Introduction
Les fragments correspondent à une portion d’interface graphique. Ce fragment peut permettre d’avoir plusieurs parties indépendantes d’interface dans une même activité, ou bien d’avoir une section réutilisable d’interface graphique (une partie d’interface qui peut être réutilisée dans plusieurs activités).
Tout comme les activités, les fragments ont un cycle de vie propre à eux (les événements « onCreate », « onStart », « onResume », « onPause », etc.). D’une certaine manière, on peut considérer un fragment comme une « sous-activité ».
Contrairement à une activité, un fragment est toujours contenu à l’intérieur d’une activité (de type « FragmentActivity »). L’état d’un fragment est également directement relié à l’état de l’activité qui le contient. Par exemple, si une activité est en pause, tous les fragments qu’il contient seront mis en pause.
Le fragment est placé dans un « layout » d’une activité de la même manière que n’importe quel « widget » graphique. Par contre, il est important de comprendre que le fragment a un « layout » qui lui est propre et qui sera utilisé pour indiquer ce qui sera placé dans la section du « layout » de l’activité. Il est également important de considérer qu’un fragment peut être ajouté dynamiquement à un « layout » d’activité (ce qu’on appelle attaché) et retiré de la même manière (ce qu’on appelle détaché).
Prendre note que les fragments sont apparus dans l’API 11 d’Android. Donc, tous les appareils présentement supportés devraient gérer sans problème les fragments.
Le cycle de vie d’un fragment
Un fragment a les mêmes états qu’une activité (créé, démarré, en service, en pause, arrêté), mais il y a des événements importants supplémentaires. Voici le diagramme d’événements que vous pouvez comparer avec celui des activités.
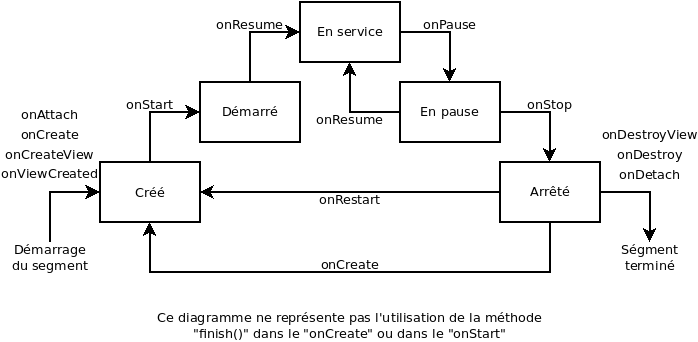
Voici la description des nouveaux événements:
-
- onAttach:
- Premier événement d’un segment;
- Reçois le contexte de l’activité contenant le fragment en argument;
- Permets de créer un lien entre le fragment et l’activité qui le contient.
- Il est important de lancer « super.onAttach ».
- onAttach:
À noter: avant l’API 23, cet événement recevait directement l’activité. Comme ceci:
public void onAttach (Activity activity)
Par contre, depuis l’API 23, l’événement reçoit un Context (qui est généralement l’Activité, mais sous une autre forme). Donc, pour obtenir l’activité dans cette méthode, il faut utiliser ce code:
@Override
public void onAttach (Context context) {
    super.onAttach(context);
    Activity activite = getActivity();
    ...
}
-
- onCreateView
- Lancé après le « onCreate »;
- Cet événement est un événement clé du système de fragment;
- Contrairement aux activités, les fragments n’utilisent pas la méthode « SetContentView » pour afficher un « layout »;
- L’événement « onCreateView » reçoit un objet « LayoutInflater » (voir plus bas), le « ViewGroup » (« layout ») qui contiendra le fragment et un « Bundle » de sauvegarde d’instance similaire à celui du « onCreate »;
- L’événement « onCreateView » retourne un objet de type « View » qui représente la vue à afficher dans le fragment;
- Pour retourner un « layout », il faut utiliser un objet de type « LayoutInflater » qui permet de transformer un « layout » en « View ».
- Il est tout de même à noter que n’importe quel « widget » pourrait être retourné.
- Il n’est pas nécessaire de lancer le « super.onCreateView ».
- onCreateView
@Override
public View onCreateView(LayoutInflater inflater, ViewGroup container,
                         Bundle savedInstanceState) {
    return inflater.inflate(R.layout.mon_fragment, container, false);
}
-
- onViewCreated
- Lancé après « onCreateView »;
- Dernière étape avant l’état « Créé ».
- Permets d’effectuer des accès aux vues du fragment.
- Prends deux arguments:
- Une vue représentant le « layout » du fragment
- Il est à noter que dans les autres méthodes de la classe, on peut utiliser la méthode « getView() » afin d’avoir accès à cette vue.
- Il est important de ne pas utiliser « getView() » avant que cet événement soit lancé (en d’autres mots, ne pas utiliser « getView() » dans le « onAttach », dans le « onCreate » ou dans le « onCreateView ».
- Un « bundle » représentant l’état sauvegardé du fragment (similaire au « bundle » envoyé au « onCreate » (peut être null).
- Une vue représentant le « layout » du fragment
- onViewCreated
public void onViewCreated(View view, Bundle savedInstanceState) {
    ImageView lImageView;
    lImageView = view.findViewById(R.id.image);
    lImageView.setImageResource(imageId);
}
-
- onDestroyView
- Lancé avant le « onDestroy »;
- Lancé seulement dans le cas où une vue est retournée du « onCreateView »;
- Peu utilisé;
- Le parent (Activité) est encore attaché et la vue toujours accessible. Il est donc possible de faire un transfert de données entre la vue et le parent avant que le fragment soit libéré;
- Ne reçois aucun argument et ne retourne aucune valeur.
- onDestroyView
-
- onDetach
- Lancé après le « onDestroy »;
- Peu utilisé;
- Se lance lorsque le lien entre le parent (activité) et le fragment est détruit.
- Ne reçois aucun argument et ne retourne aucune valeur.
- onDetach
Ajouter un fragment à un « layout »
La manière la plus facile d’ajouter un fragment au « layout » d’une activité est d’utiliser le « widget » « FragmentContainerView » .
Voici un exemple simple dans lequel j’ajoute un fragment:
Le fichier MainActivity.java:
public class MainActivity extends AppCompatActivity {

    @Override
    protected void onCreate(Bundle savedInstanceState) {
        super.onCreate(savedInstanceState);
        setContentView(R.layout.activity_main);
    }
}
Ce fichier est un fichier Android de base. J’ai modifié l’héritage (« FragmentActivity » au lieu de « AppCompatActivity »), mais ça aurait fonctionné sans problème avec l’héritage de base.
Le fichier MonFragment.java:
public class MonFragment extends Fragment {

    @Override
    public View onCreateView(LayoutInflater inflater, ViewGroup container,
                             Bundle savedInstanceState) {
        return inflater.inflate(R.layout.mon_fragment, container, false);
    }
}
Ce fichier ne fait que retourner le « layout » du fragment en utilisant un objet « Inflater ».
Maintenant, voici le layout du « MainActivity » (le fichier « activity_main.xml »):
<?xml version="1.0" encoding="utf-8"?>
<LinearLayout xmlns:android="http://schemas.android.com/apk/res/android"
    xmlns:tools="http://schemas.android.com/tools"
    android:layout_width="match_parent"
    android:layout_height="match_parent"
    tools:context=".MainActivity"
    android:orientation="vertical">


    <Button
        android:id="@+id/button"
        android:layout_width="match_parent"
        android:layout_height="match_parent"
        android:layout_weight="3"
        android:text="Button" />

    <androidx.fragment.app.FragmentContainerView
        android:id="@+id/fragment_conteneur"
        android:name="me.louismarchand.exemplefragment.MonFragment"
        android:layout_width="match_parent"
        android:layout_height="match_parent"
        android:layout_weight="1"/>

</LinearLayout>
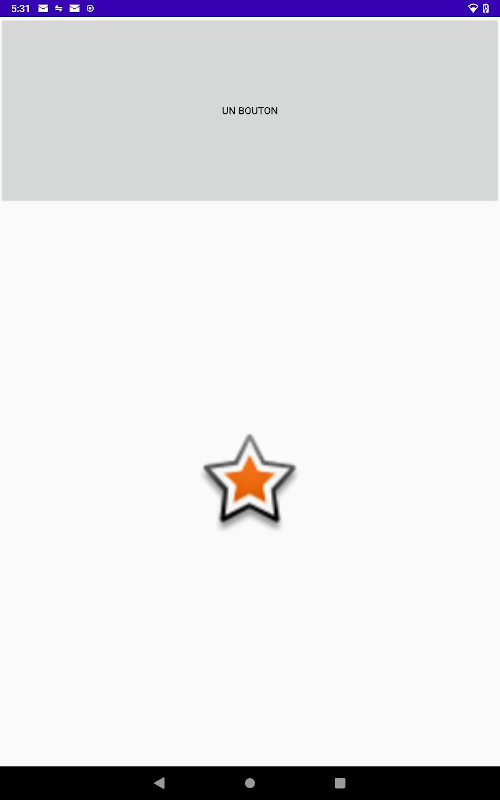
J’ai ajouté un bouton pour que vous voyiez que le fragment ne prend qu’une partie de l’interface. Également, j’ai utilisé un « weight » pour m’assurer que le bouton soit 3 fois plus petit que le fragment.
Finalement, le « layout » du fragment ne fait qu’afficher une image centrée dans le fragment. Voici le fichier « mon_fragment.xml »:
<?xml version="1.0" encoding="utf-8"?>
<LinearLayout xmlns:android="http://schemas.android.com/apk/res/android"
    xmlns:tools="http://schemas.android.com/tools"
    android:layout_width="match_parent"
    android:layout_height="match_parent"
    android:gravity="center"
    android:orientation="vertical"
    tools:context=".MainActivity">

    <ImageView
        android:id="@+id/image"
        android:layout_width="150dip"
        android:layout_height="150dip"
        android:src="@android:drawable/star_big_on" />
</LinearLayout>
Voici le résultat sur une tablette:
Changer un fragment à partir du code
Pour modifier un fragment à partir du code Java, il faut utiliser un « FragmentTransaction ». Les objets de type « FragmentTransaction » permettent de gérer le bouton arrière (« back » ) de l’appareil Android afin de revenir aux fragments précédents. Voici un exemple:
public void changerFragment() {
    Fragment unFragment = new MonFragment();
    FragmentTransaction lFragmentTansaction = getSupportFragmentManager().beginTransaction();
    lFragmentTansaction.replace(R.id.fragment_container, unFragment);
    lFragmentTansaction.addToBackStack(null);
    lFragmentTansaction.commit();
}
La méthode « getSupportFragmentManager » est une méthode accessible à partir de tout « FragmentActivity » qui permet d’avoir accès au gestionnaire de fragment de l’activité. Grâce à ce gestionnaire de fragment, on peut créer une transaction qui permet de placer un nouveau fragment dans un « layout ».
La méthode « replace » permet de changer le contenue d’un « widget » conteneur (dans ce cas-ci, un « FragmentContainerView » identifié par « fragment_conteneur ») afin d’y placer un fragment.
La méthode « addToBackStack » permet de garder l’état du fragment afin de pouvoir y revenir lorsque le bouton reculer (« Back ») d’Android est utilisé. Vous pouvez ignorer l’argument qui consiste en une étiquette « String » optionnelle sans grande importance.
Finalement, la méthode « commit » permet de lancer la transaction et, de fait, afficher le fragment.
Voici un exemple qui vous permet également de tester l’utilisation du « BackStack »:
Fichier MainActivity.java:
public class MainActivity extends AppCompatActivity {

    @Override
    protected void onCreate(Bundle savedInstanceState) {
        super.onCreate(savedInstanceState);
        setContentView(R.layout.activity_main);
    }

    public void boutonsClick(View aVue) {
        Fragment lFragment = null;
        FragmentTransaction lFragmentTansaction;
        if (aVue.getId() == R.id.bouton_etoile) {
            lFragment = new MonFragment(android.R.drawable.star_big_on);
        } else if (aVue.getId() == R.id.bouton_camera) {
            lFragment = new MonFragment(android.R.drawable.presence_video_online);
        } else if (aVue.getId() == R.id.bouton_microphone) {
            lFragment = new MonFragment(android.R.drawable.ic_btn_speak_now);
        } else if (aVue.getId() == R.id.bouton_telephone) {
            lFragment = new MonFragment(android.R.drawable.sym_action_call);
        }
        if (lFragment != null) {
            lFragmentTansaction = getSupportFragmentManager().beginTransaction();
            lFragmentTansaction.replace(R.id.fragment_conteneur, lFragment);
            lFragmentTansaction.addToBackStack(null);
            lFragmentTansaction.commit();
        }
    }
}
Fichier MonFragment.java:
public class MonFragment extends Fragment {

    private int imageId;

    public MonFragment(int aImageId) {
        super();
        imageId = aImageId;
    }

    public MonFragment() {
        imageId = android.R.drawable.star_big_on;
    }

    @Override
    public View onCreateView(LayoutInflater inflater, ViewGroup container,
                             Bundle savedInstanceState) {
        return inflater.inflate(R.layout.mon_fragment, container, false);
    }

    public void onViewCreated(View view, Bundle savedInstanceState) {
        ImageView lImageView;
        lImageView = view.findViewById(R.id.image);
        lImageView.setImageResource(imageId);
    }
}
Le fragment permet d’afficher une image différente en recevant un ID de ressource dans son constructeur.
Le fichier activity_main.xml:
<?xml version="1.0" encoding="utf-8"?>
<LinearLayout xmlns:android="http://schemas.android.com/apk/res/android"
    xmlns:tools="http://schemas.android.com/tools"
    android:layout_width="match_parent"
    android:layout_height="match_parent"
    tools:context=".MainActivity"
    android:orientation="vertical">


    <LinearLayout
        android:layout_width="match_parent"
        android:layout_height="match_parent"
        android:layout_weight="3"
        android:orientation="horizontal">
        <LinearLayout
            android:layout_width="match_parent"
            android:layout_height="match_parent"
            android:layout_weight="1"
            android:orientation="vertical">

            <Button
                android:id="@+id/bouton_etoile"
                android:layout_width="match_parent"
                android:layout_height="match_parent"
                android:layout_weight="1"
                android:onClick="boutonsClick"
                android:text="@string/bouton_etoile_texte" />

            <Button
                android:id="@+id/bouton_camera"
                android:layout_width="match_parent"
                android:layout_height="match_parent"
                android:layout_weight="1"
                android:onClick="boutonsClick"
                android:text="@string/bouton_camera_texte" />
        </LinearLayout>
        <LinearLayout
            android:layout_width="match_parent"
            android:layout_height="match_parent"
            android:layout_weight="1"
            android:orientation="vertical">

            <Button
                android:id="@+id/bouton_telephone"
                android:layout_width="match_parent"
                android:layout_height="match_parent"
                android:layout_weight="1"
                android:onClick="boutonsClick"
                android:text="@string/bouton_telephone_texte" />

            <Button
                android:id="@+id/bouton_microphone"
                android:layout_width="match_parent"
                android:layout_height="match_parent"
                android:layout_weight="1"
                android:onClick="boutonsClick"
                android:text="@string/bouton_microphone_texte" />
        </LinearLayout>
    </LinearLayout>

    <androidx.fragment.app.FragmentContainerView
        android:id="@+id/fragment_conteneur"
        android:name="me.louismarchand.exemplefragment.MonFragment"
        android:layout_width="match_parent"
        android:layout_height="match_parent"
        android:layout_weight="1"/>

</LinearLayout>
Le fichier mon_fragment.xml:
<?xml version="1.0" encoding="utf-8"?>
<LinearLayout xmlns:android="http://schemas.android.com/apk/res/android"
    xmlns:tools="http://schemas.android.com/tools"
    android:layout_width="match_parent"
    android:layout_height="match_parent"
    android:gravity="center"
    android:orientation="vertical"
    tools:context=".MainActivity">

    <ImageView
        android:id="@+id/image"
        android:layout_width="150dip"
        android:layout_height="150dip" />
</LinearLayout>
Finalement, le fichier de constantes strings.xml:
<resources>
    <string name="app_name">Exemple Fragment</string>
    <string name="bouton_etoile_texte">Étoile</string>
    <string name="bouton_camera_texte">Caméra</string>
    <string name="bouton_telephone_texte">Téléphone</string>
    <string name="bouton_microphone_texte">Microphone</string>
</resources>
Le résultat devrait ressembler à ceci:
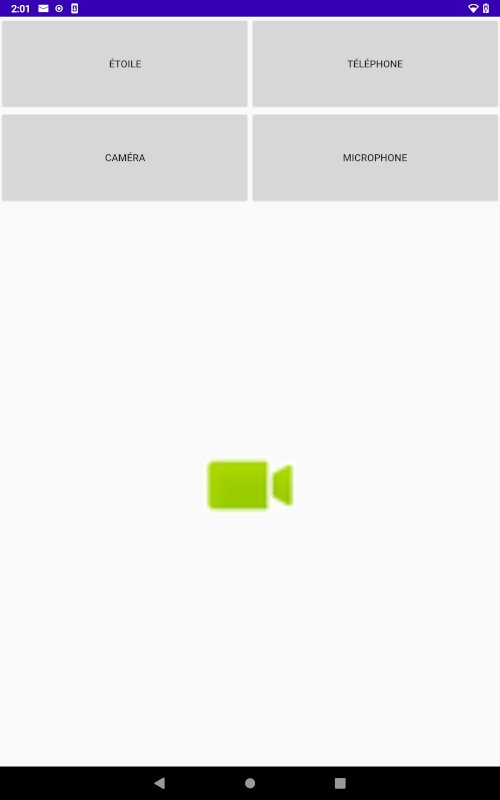
En utilisant les boutons, vous pouvez afficher des images différentes dans le fragment et en appuyant sur la touche retour (ou « Back »), vous pouvez naviguer entre les différentes images affichées.
Attention aux constructeurs de fragments avec arguments
Il est à noter que le fragment a un problème tel qu’il est créé. En effet, si Android détruit le fragment (pour récupérer de l’espace disque par exemple), l’attribut « imageId » sera perdu (puisqu’Android recréera fragment avec le constructeur sans argument).
Il est possible de tester cette problématique en utilisant l’option de développeur « Ne pas conserver activités » (ou « Don’t keep activities »).
Pour régler ce problème, au lieu d’assigner les attributs du fragment directement dans le constructeur, on peut placer les arguments dans le « Bundle » « setArguments » et utiliser le « onCreate » pour assigner l’attribut en utilisant « getArguments ». Voici un exemple qui modifie la classe de MonFragment vue plus haut:
public class MonFragment extends Fragment {

    private int imageId;

    public MonFragment(int aImageId) {
        super();
        Bundle lArguments = new Bundle();
        lArguments.putInt("imageId", aImageId);
        setArguments(lArguments);
    }

    public MonFragment() {
        imageId = android.R.drawable.star_big_on;
    }

    @Override
    public void onCreate(@Nullable Bundle savedInstanceState) {
        super.onCreate(savedInstanceState);
        Bundle lArguments = getArguments();
        if (lArguments != null) {
            imageId = lArguments.getInt("imageId");
        }
    }

    @Override
    public View onCreateView(LayoutInflater inflater, ViewGroup container,
                             Bundle savedInstanceState) {
        return inflater.inflate(R.layout.mon_fragment, container, false);
    }

    public void onViewCreated(View view, Bundle savedInstanceState) {
        ImageView lImageView;
        lImageView = view.findViewById(R.id.image);
        lImageView.setImageResource(imageId);
    }
}
Variations de » layout »
Il est possible de faire des variations de « layout » en fonction de plusieurs caractéristiques. Comme par exemple, on peut faire une variation de « layout » dans le cas où l’écran est en orientation paysage ou bien une variation lorsque l’application est sur un gros écran (variation tablette). Pour ce faire, il faut faire un répertoire « layout-land » (dans « res ») pour l’orientation paysage et un répertoire « layout-sw600dp » pour le mode tablette. Vous pouvez également facilement faire le même travail dans Android Studio en utilisant l’option « Create landscape variation » ou « Create tablet variation » dans le menu orientation de l’outil de « layout ».
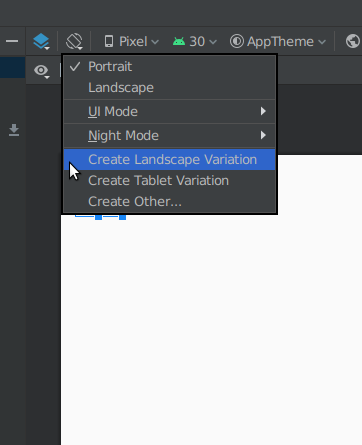
Les fragments peuvent en fait être très utiles dans ce type de variation. Il est possible par exemple d’organiser les sections (positions des fragments) en fonction de l’orientation et d’utiliser les mêmes fragments. Ça permet en fait d’éviter beaucoup de duplication de code dans les « layouts ». Par exemple, si dans l’exemple, j’ajoute ce fichier:
Fichier res/layout-land/activity-main.xml:
<?xml version="1.0" encoding="utf-8"?>
<LinearLayout xmlns:android="http://schemas.android.com/apk/res/android"
    xmlns:tools="http://schemas.android.com/tools"
    android:layout_width="match_parent"
    android:layout_height="match_parent"
    tools:context=".MainActivity"
    android:orientation="horizontal">


    <Button
        android:id="@+id/button"
        android:layout_width="match_parent"
        android:layout_height="match_parent"
        android:layout_weight="3"
        android:text="Button" />

    <androidx.fragment.app.FragmentContainerView
        android:id="@+id/fragment_conteneur"
        android:name="me.louismarchand.exemplefragment.MonFragment"
        android:layout_width="match_parent"
        android:layout_height="match_parent"
        android:layout_weight="1"/>

</LinearLayout>
Il est à remarquer que le « LinearLayout » qui était vertical dans le « layout » de base est horizontal dans le « layout » paysage. De cette manière, le « layout » portrait met le bouton au-dessus du fragment et le « layout » paysage met le bouton à gauche.
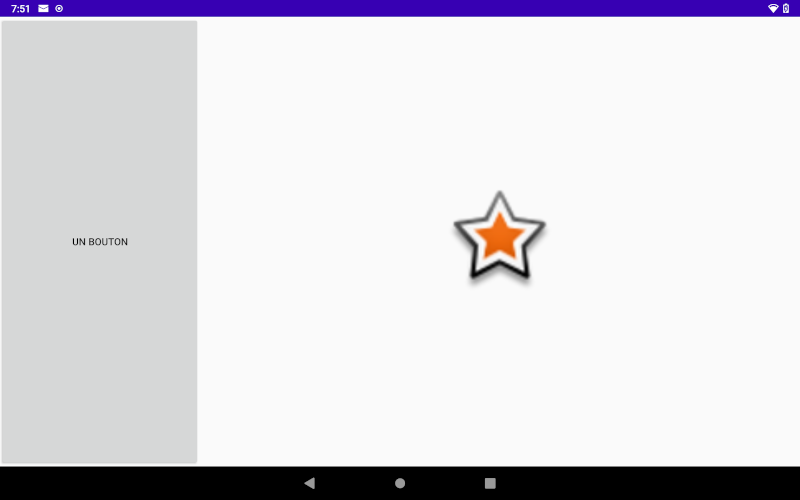
Les listes de fragments
Il est souvent nécessaire d’afficher une liste d’information à l’écran (liste de fichiers, de vidéos, de courriels, etc.) Afficher ce genre de liste nécessite des manipulations similaires aux fragments.
Afin de faire une liste d’élément à afficher en Android, nous avons besoin de ces éléments:
-
-
- Un « layout » de type « RecyclerView »;
- Un « layout » représentant une cellule de la liste;
- Un « ViewHolder » permettant l’accès aux vues du « layout » d’une cellule;
- Un adaptateur qui permet d’assigner les informations du programme aux différentes vues du « ViewHolder;
-
Le « RecyclerView »
Représente l’endroit où nous allons afficher les cellules de la liste. On peut d’une certaine manière dire qu’il s’agit de notre liste à afficher.
Le fichier « activity_main.xml »:
<?xml version="1.0" encoding="utf-8"?>
<androidx.recyclerview.widget.RecyclerView xmlns:android="http://schemas.android.com/apk/res/android"
    xmlns:tools="http://schemas.android.com/tools"
    android:id="@+id/recycler_ressource"
    android:layout_width="match_parent"
    android:layout_height="match_parent"
    tools:context=".MainActivity">

</androidx.recyclerview.widget.RecyclerView>
Le « layout » d’une cellule de la liste
Représente seulement comment les informations de la liste seront affichées dans chaque cellule de la liste.
Le fichier « ressource_image_item.xml »:
<?xml version="1.0" encoding="utf-8"?>
<LinearLayout xmlns:android="http://schemas.android.com/apk/res/android"
    xmlns:tools="http://schemas.android.com/tools"
    android:layout_width="match_parent"
    android:layout_height="wrap_content"
    android:orientation="horizontal"
    tools:context=".MainActivity">

    <TextView
        android:id="@+id/ressource_texte"
        android:layout_width="wrap_content"
        android:layout_height="wrap_content"
        android:layout_gravity="center"
        android:layout_weight="1" />

    <ImageView
        android:id="@+id/ressource_image"
        android:layout_width="150dp"
        android:layout_height="150dp" />
</LinearLayout>
Le « ViewHolder »
Le view holder est simplement une classe permettant un accès simple à différentes vues d’un « layout ». Il faut en quelque sorte le voir comme un raccourcie vers les vues de notre « layout » de cellule de liste.
Le fichier « RessourceImageHolder.java »:
import android.view.View;
import android.widget.ImageView;
import android.widget.TextView;

import androidx.recyclerview.widget.RecyclerView;

public class RessourceImageHolder extends RecyclerView.ViewHolder {

    private TextView ressourceTexteView;

    public TextView getRessourceTexteView() {
        return ressourceTexteView;
    }

    private ImageView ressourceImageView;

    public ImageView getRessourceImageView() {
        return ressourceImageView;
    }

    public RessourceImageHolder(View aVue) {
        super(aVue);
        ressourceImageView = aVue.findViewById(R.id.ressource_image);
        ressourceTexteView = aVue.findViewById(R.id.ressource_texte);
    }

}
L’adaptateur
Le dernier élément de notre structure est l’adaptateur. Un adaptateur est un patron conceptuel permettant de faire le pont entre deux types de valeurs incompatibles. Dans mon exemple, l’adaptateur permet d’adapter des « RessourceInformation » (contenant un texte et un ID d’une image Android) vers une vue qui affiche le texte dans une « TextView » et affiche l’image dans un ImageView.
Le fichier « RessourceInformation.java »:
public class RessourceInformation {

    private String texte;

    private int id;

    public String getTexte() {
        return texte;
    }

    public void setTexte(String aTexte) {
        texte = aTexte;
    }

    public int getId(){
        return id;
    }

    public void setId(int aId) {
        id = aId;
    }

    public RessourceInformation(String aTexte, int aId) {
        texte = aTexte;
        id = aId;
    }
}
Ce fichier est utilisé comme tuple afin de placer autant un « String » qu’un « int » dans une liste.
Le fichier « RessourceAdaptateur.java:
import android.view.LayoutInflater;
import android.view.View;
import android.view.ViewGroup;

import androidx.recyclerview.widget.RecyclerView;

import java.util.List;

public class RessourceAdaptateur extends RecyclerView.Adapter<RessourceImageHolder> {

    private List<RessourceInformation> ressourcesInformation;

    public RessourceAdaptateur(List<RessourceInformation> aRessourcesInformation) {
        ressourcesInformation = aRessourcesInformation;
    }

    @Override
    public RessourceImageHolder onCreateViewHolder(ViewGroup aGroupe, int aIndex) {
        View lRessourceImageRItem = LayoutInflater.from(aGroupe.getContext())
                .inflate(R.layout.ressource_image_item, aGroupe, false);
        return new RessourceImageHolder(lRessourceImageRItem);
    }

    @Override
    public int getItemCount() {
        return ressourcesInformation.size();
    }

    @Override
    public void onBindViewHolder(RessourceImageHolder aHolder, int aIndex) {
        aHolder.getRessourceTexteView().setText(ressourcesInformation.get(aIndex).getTexte());
        aHolder.getRessourceImageView().setImageResource(ressourcesInformation.get(aIndex).getId());
    }

}
Dans ce fichier, on voit trois (3) méthodes obligatoires:
-
- onCreateViewHolder
- Permets de créer une nouvelle vue à partir du « layout » d’une cellule de liste;
- Cette méthode prend deux (2) arguments:
- Le « ViewGroup » correspond au « RecyclerView »;
- L’index représente le numéro de la cellule à construire. Nous pourrions donc utiliser un « layout » différent en fonction de la ligne à utiliser. Il faut par contre que tous ces « layouts » soient conforme au « ViewHolder » créé plus haut.
- Cette méthode doit retourner le « ViewHolder » vide qui sera utilisé plus tard par l’adaptateur;
- En général, cette méthode permet de créer un « ViewHolder » en utilisant un « LayoutInflater » similaire à la création de fragments. Par contre, ici, contrairement aux fragments, nous n’avons pas directement un « LayoutInflateur » à utiliser. Nous pouvons obtenir un « LayoutInflateur » avec le code:
LayoutInflater.from(aGroupe.getContext())
- getItemCount
- Retourne le nombre de cellules que la liste doit contenir.
- onBindViewHolder
- Sert à assigner les valeurs aux vues du « ViewHolder »
- Cette méthode prend deux (2) arguments:
- Le « ViewHolder » dont les vues doivent être assignées;
- L’index de la cellule de la liste que le « ViewHolder » fait référence.
- onCreateViewHolder
À propos des adaptateurs
Il est à noter qu’il existe plusieurs « sous-types » d’adaptateur qui permettent de faire un travail similaire dans le cas ou nous avons des « layouts » simples. Par exemple, l’adaptateur « ArrayAdapteur » peut facilement afficher une liste de chaîne de caractère en utilisant une simple liste de « String ».
Si vous désirez tester les fichiers envoyés plus haut, voici une activité « main » qui vous permet de voir toutes les ressources image prédéfinie dans le système Android. Prendre en note que la méthode « initialiseRessourcesInformation » est très longue. Par contre, puisqu’il s’agit d’une méthode qui ne fait qu’insérer des valeurs dans une liste, il est généralement accepté d’avoir ce type de méthode plus grande que le classique 45 lignes maximum. Le bout de code intéressant ici se trouve dans la méthode « initialiseRecyclerView ». Dans cette méthode est créé l’adaptateur et ce dernier est assigné au « RecyclerView ». Le « LayoutManager » permet de gérer comment sera affiché les cellules dans le « RecyclerView ».
Fichier « MainActivity.java »:
import androidx.appcompat.app.AppCompatActivity;
import androidx.recyclerview.widget.DividerItemDecoration;
import androidx.recyclerview.widget.LinearLayoutManager;
import androidx.recyclerview.widget.RecyclerView;
import android.os.Bundle;
import java.util.ArrayList;
import java.util.List;
public class MainActivity extends AppCompatActivity {
private List<RessourceInformation> ressourcesInformation;
@Override
protected void onCreate(Bundle savedInstanceState) {
super.onCreate(savedInstanceState);
setContentView(R.layout.activity_main);
initialiseRessourcesInformation();
initialiseRecyclerView();
}
private void initialiseRecyclerView(){
RessourceAdaptateur lAdaptateur = new RessourceAdaptateur(ressourcesInformation);
RecyclerView lRecyclerView = findViewById(R.id.recycler_ressource);
RecyclerView.LayoutManager lManager=new LinearLayoutManager(this);
lRecyclerView.addItemDecoration(new DividerItemDecoration(this, LinearLayoutManager.VERTICAL));
lRecyclerView.setAdapter(lAdaptateur);
lRecyclerView.setLayoutManager(lManager);
}
private void initialiseRessourcesInformation(){
ressourcesInformation = new ArrayList<RessourceInformation>(174);
ressourcesInformation.add(new RessourceInformation(
"android.R.drawable.alert_dark_frame",
android.R.drawable.alert_dark_frame));
ressourcesInformation.add(new RessourceInformation(
"android.R.drawable.alert_light_frame",
android.R.drawable.alert_light_frame));
ressourcesInformation.add(new RessourceInformation(
"android.R.drawable.arrow_down_float",
android.R.drawable.arrow_down_float));
ressourcesInformation.add(new RessourceInformation(
"android.R.drawable.arrow_up_float",
android.R.drawable.arrow_up_float));
ressourcesInformation.add(new RessourceInformation(
"android.R.drawable.bottom_bar",
android.R.drawable.bottom_bar));
ressourcesInformation.add(new RessourceInformation(
"android.R.drawable.btn_default",
android.R.drawable.btn_default));
ressourcesInformation.add(new RessourceInformation(
"android.R.drawable.btn_default_small",
android.R.drawable.btn_default_small));
ressourcesInformation.add(new RessourceInformation(
"android.R.drawable.btn_dialog",
android.R.drawable.btn_dialog));
ressourcesInformation.add(new RessourceInformation(
"android.R.drawable.btn_dropdown",
android.R.drawable.btn_dropdown));
ressourcesInformation.add(new RessourceInformation(
"android.R.drawable.btn_minus",
android.R.drawable.btn_minus));
ressourcesInformation.add(new RessourceInformation(
"android.R.drawable.btn_plus",
android.R.drawable.btn_plus));
ressourcesInformation.add(new RessourceInformation(
"android.R.drawable.btn_radio",
android.R.drawable.btn_radio));
ressourcesInformation.add(new RessourceInformation(
"android.R.drawable.btn_star",
android.R.drawable.btn_star));
ressourcesInformation.add(new RessourceInformation(
"android.R.drawable.btn_star_big_off",
android.R.drawable.btn_star_big_off));
ressourcesInformation.add(new RessourceInformation(
"android.R.drawable.btn_star_big_on",
android.R.drawable.btn_star_big_on));
ressourcesInformation.add(new RessourceInformation(
"android.R.drawable.button_onoff_indicator_off",
android.R.drawable.button_onoff_indicator_off));
ressourcesInformation.add(new RessourceInformation(
"android.R.drawable.button_onoff_indicator_on",
android.R.drawable.button_onoff_indicator_on));
ressourcesInformation.add(new RessourceInformation(
"android.R.drawable.checkbox_off_background",
android.R.drawable.checkbox_off_background));
ressourcesInformation.add(new RessourceInformation(
"android.R.drawable.checkbox_on_background",
android.R.drawable.checkbox_on_background));
ressourcesInformation.add(new RessourceInformation(
"android.R.drawable.dark_header",
android.R.drawable.dark_header));
ressourcesInformation.add(new RessourceInformation(
"android.R.drawable.dialog_frame",
android.R.drawable.dialog_frame));
ressourcesInformation.add(new RessourceInformation(
"android.R.drawable.dialog_holo_dark_frame",
android.R.drawable.dialog_holo_dark_frame));
ressourcesInformation.add(new RessourceInformation(
"android.R.drawable.dialog_holo_light_frame",
android.R.drawable.dialog_holo_light_frame));
ressourcesInformation.add(new RessourceInformation(
"android.R.drawable.divider_horizontal_bright",
android.R.drawable.divider_horizontal_bright));
ressourcesInformation.add(new RessourceInformation(
"android.R.drawable.divider_horizontal_dark",
android.R.drawable.divider_horizontal_dark));
ressourcesInformation.add(new RessourceInformation(
"android.R.drawable.divider_horizontal_dim_dark",
android.R.drawable.divider_horizontal_dim_dark));
ressourcesInformation.add(new RessourceInformation(
"android.R.drawable.divider_horizontal_textfield",
android.R.drawable.divider_horizontal_textfield));
ressourcesInformation.add(new RessourceInformation(
"android.R.drawable.edit_text",
android.R.drawable.edit_text));
ressourcesInformation.add(new RessourceInformation(
"android.R.drawable.editbox_background",
android.R.drawable.editbox_background));
ressourcesInformation.add(new RessourceInformation(
"android.R.drawable.editbox_background_normal",
android.R.drawable.editbox_background_normal));
ressourcesInformation.add(new RessourceInformation(
"android.R.drawable.editbox_dropdown_dark_frame",
android.R.drawable.editbox_dropdown_dark_frame));
ressourcesInformation.add(new RessourceInformation(
"android.R.drawable.editbox_dropdown_light_frame",
android.R.drawable.editbox_dropdown_light_frame));
ressourcesInformation.add(new RessourceInformation(
"android.R.drawable.gallery_thumb",
android.R.drawable.gallery_thumb));
ressourcesInformation.add(new RessourceInformation(
"android.R.drawable.ic_btn_speak_now",
android.R.drawable.ic_btn_speak_now));
ressourcesInformation.add(new RessourceInformation(
"android.R.drawable.ic_delete",
android.R.drawable.ic_delete));
ressourcesInformation.add(new RessourceInformation(
"android.R.drawable.ic_dialog_alert",
android.R.drawable.ic_dialog_alert));
ressourcesInformation.add(new RessourceInformation(
"android.R.drawable.ic_dialog_dialer",
android.R.drawable.ic_dialog_dialer));
ressourcesInformation.add(new RessourceInformation(
"android.R.drawable.ic_dialog_email",
android.R.drawable.ic_dialog_email));
ressourcesInformation.add(new RessourceInformation(
"android.R.drawable.ic_dialog_info",
android.R.drawable.ic_dialog_info));
ressourcesInformation.add(new RessourceInformation(
"android.R.drawable.ic_dialog_map",
android.R.drawable.ic_dialog_map));
ressourcesInformation.add(new RessourceInformation(
"android.R.drawable.ic_input_add",
android.R.drawable.ic_input_add));
ressourcesInformation.add(new RessourceInformation(
"android.R.drawable.ic_input_delete",
android.R.drawable.ic_input_delete));
ressourcesInformation.add(new RessourceInformation(
"android.R.drawable.ic_input_get",
android.R.drawable.ic_input_get));
ressourcesInformation.add(new RessourceInformation(
"android.R.drawable.ic_lock_idle_alarm",
android.R.drawable.ic_lock_idle_alarm));
ressourcesInformation.add(new RessourceInformation(
"android.R.drawable.ic_lock_idle_charging",
android.R.drawable.ic_lock_idle_charging));
ressourcesInformation.add(new RessourceInformation(
"android.R.drawable.ic_lock_idle_lock",
android.R.drawable.ic_lock_idle_lock));
ressourcesInformation.add(new RessourceInformation(
"android.R.drawable.ic_lock_idle_low_battery",
android.R.drawable.ic_lock_idle_low_battery));
ressourcesInformation.add(new RessourceInformation(
"android.R.drawable.ic_lock_lock",
android.R.drawable.ic_lock_lock));
ressourcesInformation.add(new RessourceInformation(
"android.R.drawable.ic_lock_power_off",
android.R.drawable.ic_lock_power_off));
ressourcesInformation.add(new RessourceInformation(
"android.R.drawable.ic_lock_silent_mode",
android.R.drawable.ic_lock_silent_mode));
ressourcesInformation.add(new RessourceInformation(
"android.R.drawable.ic_lock_silent_mode_off",
android.R.drawable.ic_lock_silent_mode_off));
ressourcesInformation.add(new RessourceInformation(
"android.R.drawable.ic_media_ff",
android.R.drawable.ic_media_ff));
ressourcesInformation.add(new RessourceInformation(
"android.R.drawable.ic_media_next",
android.R.drawable.ic_media_next));
ressourcesInformation.add(new RessourceInformation(
"android.R.drawable.ic_media_pause",
android.R.drawable.ic_media_pause));
ressourcesInformation.add(new RessourceInformation(
"android.R.drawable.ic_media_play",
android.R.drawable.ic_media_play));
ressourcesInformation.add(new RessourceInformation(
"android.R.drawable.ic_media_previous",
android.R.drawable.ic_media_previous));
ressourcesInformation.add(new RessourceInformation(
"android.R.drawable.ic_media_rew",
android.R.drawable.ic_media_rew));
ressourcesInformation.add(new RessourceInformation(
"android.R.drawable.ic_menu_add",
android.R.drawable.ic_menu_add));
ressourcesInformation.add(new RessourceInformation(
"android.R.drawable.ic_menu_agenda",
android.R.drawable.ic_menu_agenda));
ressourcesInformation.add(new RessourceInformation(
"android.R.drawable.ic_menu_always_landscape_portrait",
android.R.drawable.ic_menu_always_landscape_portrait));
ressourcesInformation.add(new RessourceInformation(
"android.R.drawable.ic_menu_call",
android.R.drawable.ic_menu_call));
ressourcesInformation.add(new RessourceInformation(
"android.R.drawable.ic_menu_camera",
android.R.drawable.ic_menu_camera));
ressourcesInformation.add(new RessourceInformation(
"android.R.drawable.ic_menu_close_clear_cancel",
android.R.drawable.ic_menu_close_clear_cancel));
ressourcesInformation.add(new RessourceInformation(
"android.R.drawable.ic_menu_compass",
android.R.drawable.ic_menu_compass));
ressourcesInformation.add(new RessourceInformation(
"android.R.drawable.ic_menu_crop",
android.R.drawable.ic_menu_crop));
ressourcesInformation.add(new RessourceInformation(
"android.R.drawable.ic_menu_day",
android.R.drawable.ic_menu_day));
ressourcesInformation.add(new RessourceInformation(
"android.R.drawable.ic_menu_delete",
android.R.drawable.ic_menu_delete));
ressourcesInformation.add(new RessourceInformation(
"android.R.drawable.ic_menu_directions",
android.R.drawable.ic_menu_directions));
ressourcesInformation.add(new RessourceInformation(
"android.R.drawable.ic_menu_edit",
android.R.drawable.ic_menu_edit));
ressourcesInformation.add(new RessourceInformation(
"android.R.drawable.ic_menu_gallery",
android.R.drawable.ic_menu_gallery));
ressourcesInformation.add(new RessourceInformation(
"android.R.drawable.ic_menu_help",
android.R.drawable.ic_menu_help));
ressourcesInformation.add(new RessourceInformation(
"android.R.drawable.ic_menu_info_details",
android.R.drawable.ic_menu_info_details));
ressourcesInformation.add(new RessourceInformation(
"android.R.drawable.ic_menu_manage",
android.R.drawable.ic_menu_manage));
ressourcesInformation.add(new RessourceInformation(
"android.R.drawable.ic_menu_mapmode",
android.R.drawable.ic_menu_mapmode));
ressourcesInformation.add(new RessourceInformation(
"android.R.drawable.ic_menu_month",
android.R.drawable.ic_menu_month));
ressourcesInformation.add(new RessourceInformation(
"android.R.drawable.ic_menu_more",
android.R.drawable.ic_menu_more));
ressourcesInformation.add(new RessourceInformation(
"android.R.drawable.ic_menu_my_calendar",
android.R.drawable.ic_menu_my_calendar));
ressourcesInformation.add(new RessourceInformation(
"android.R.drawable.ic_menu_mylocation",
android.R.drawable.ic_menu_mylocation));
ressourcesInformation.add(new RessourceInformation(
"android.R.drawable.ic_menu_myplaces",
android.R.drawable.ic_menu_myplaces));
ressourcesInformation.add(new RessourceInformation(
"android.R.drawable.ic_menu_preferences",
android.R.drawable.ic_menu_preferences));
ressourcesInformation.add(new RessourceInformation(
"android.R.drawable.ic_menu_recent_history",
android.R.drawable.ic_menu_recent_history));
ressourcesInformation.add(new RessourceInformation(
"android.R.drawable.ic_menu_report_image",
android.R.drawable.ic_menu_report_image));
ressourcesInformation.add(new RessourceInformation(
"android.R.drawable.ic_menu_revert",
android.R.drawable.ic_menu_revert));
ressourcesInformation.add(new RessourceInformation(
"android.R.drawable.ic_menu_rotate",
android.R.drawable.ic_menu_rotate));
ressourcesInformation.add(new RessourceInformation(
"android.R.drawable.ic_menu_save",
android.R.drawable.ic_menu_save));
ressourcesInformation.add(new RessourceInformation(
"android.R.drawable.ic_menu_search",
android.R.drawable.ic_menu_search));
ressourcesInformation.add(new RessourceInformation(
"android.R.drawable.ic_menu_send",
android.R.drawable.ic_menu_send));
ressourcesInformation.add(new RessourceInformation(
"android.R.drawable.ic_menu_set_as",
android.R.drawable.ic_menu_set_as));
ressourcesInformation.add(new RessourceInformation(
"android.R.drawable.ic_menu_share",
android.R.drawable.ic_menu_share));
ressourcesInformation.add(new RessourceInformation(
"android.R.drawable.ic_menu_slideshow",
android.R.drawable.ic_menu_slideshow));
ressourcesInformation.add(new RessourceInformation(
"android.R.drawable.ic_menu_sort_alphabetically",
android.R.drawable.ic_menu_sort_alphabetically));
ressourcesInformation.add(new RessourceInformation(
"android.R.drawable.ic_menu_sort_by_size",
android.R.drawable.ic_menu_sort_by_size));
ressourcesInformation.add(new RessourceInformation(
"android.R.drawable.ic_menu_today",
android.R.drawable.ic_menu_today));
ressourcesInformation.add(new RessourceInformation(
"android.R.drawable.ic_menu_upload",
android.R.drawable.ic_menu_upload));
ressourcesInformation.add(new RessourceInformation(
"android.R.drawable.ic_menu_upload_you_tube",
android.R.drawable.ic_menu_upload_you_tube));
ressourcesInformation.add(new RessourceInformation(
"android.R.drawable.ic_menu_view",
android.R.drawable.ic_menu_view));
ressourcesInformation.add(new RessourceInformation(
"android.R.drawable.ic_menu_week",
android.R.drawable.ic_menu_week));
ressourcesInformation.add(new RessourceInformation(
"android.R.drawable.ic_menu_zoom",
android.R.drawable.ic_menu_zoom));
ressourcesInformation.add(new RessourceInformation(
"android.R.drawable.ic_notification_clear_all",
android.R.drawable.ic_notification_clear_all));
ressourcesInformation.add(new RessourceInformation(
"android.R.drawable.ic_notification_overlay",
android.R.drawable.ic_notification_overlay));
ressourcesInformation.add(new RessourceInformation(
"android.R.drawable.ic_partial_secure",
android.R.drawable.ic_partial_secure));
ressourcesInformation.add(new RessourceInformation(
"android.R.drawable.ic_popup_disk_full",
android.R.drawable.ic_popup_disk_full));
ressourcesInformation.add(new RessourceInformation(
"android.R.drawable.ic_popup_reminder",
android.R.drawable.ic_popup_reminder));
ressourcesInformation.add(new RessourceInformation(
"android.R.drawable.ic_popup_sync",
android.R.drawable.ic_popup_sync));
ressourcesInformation.add(new RessourceInformation(
"android.R.drawable.ic_search_category_default",
android.R.drawable.ic_search_category_default));
ressourcesInformation.add(new RessourceInformation(
"android.R.drawable.ic_secure",
android.R.drawable.ic_secure));
ressourcesInformation.add(new RessourceInformation(
"android.R.drawable.list_selector_background",
android.R.drawable.list_selector_background));
ressourcesInformation.add(new RessourceInformation(
"android.R.drawable.menu_frame",
android.R.drawable.menu_frame));
ressourcesInformation.add(new RessourceInformation(
"android.R.drawable.menu_full_frame",
android.R.drawable.menu_full_frame));
ressourcesInformation.add(new RessourceInformation(
"android.R.drawable.menuitem_background",
android.R.drawable.menuitem_background));
ressourcesInformation.add(new RessourceInformation(
"android.R.drawable.picture_frame",
android.R.drawable.picture_frame));
ressourcesInformation.add(new RessourceInformation(
"android.R.drawable.presence_audio_away",
android.R.drawable.presence_audio_away));
ressourcesInformation.add(new RessourceInformation(
"android.R.drawable.presence_audio_busy",
android.R.drawable.presence_audio_busy));
ressourcesInformation.add(new RessourceInformation(
"android.R.drawable.presence_audio_online",
android.R.drawable.presence_audio_online));
ressourcesInformation.add(new RessourceInformation(
"android.R.drawable.presence_away",
android.R.drawable.presence_away));
ressourcesInformation.add(new RessourceInformation(
"android.R.drawable.presence_busy",
android.R.drawable.presence_busy));
ressourcesInformation.add(new RessourceInformation(
"android.R.drawable.presence_invisible",
android.R.drawable.presence_invisible));
ressourcesInformation.add(new RessourceInformation(
"android.R.drawable.presence_offline",
android.R.drawable.presence_offline));
ressourcesInformation.add(new RessourceInformation(
"android.R.drawable.presence_online",
android.R.drawable.presence_online));
ressourcesInformation.add(new RessourceInformation(
"android.R.drawable.presence_video_away",
android.R.drawable.presence_video_away));
ressourcesInformation.add(new RessourceInformation(
"android.R.drawable.presence_video_busy",
android.R.drawable.presence_video_busy));
ressourcesInformation.add(new RessourceInformation(
"android.R.drawable.presence_video_online",
android.R.drawable.presence_video_online));
ressourcesInformation.add(new RessourceInformation(
"android.R.drawable.progress_horizontal",
android.R.drawable.progress_horizontal));
ressourcesInformation.add(new RessourceInformation(
"android.R.drawable.progress_indeterminate_horizontal",
android.R.drawable.progress_indeterminate_horizontal));
ressourcesInformation.add(new RessourceInformation(
"android.R.drawable.radiobutton_off_background",
android.R.drawable.radiobutton_off_background));
ressourcesInformation.add(new RessourceInformation(
"android.R.drawable.radiobutton_on_background",
android.R.drawable.radiobutton_on_background));
ressourcesInformation.add(new RessourceInformation(
"android.R.drawable.screen_background_dark",
android.R.drawable.screen_background_dark));
ressourcesInformation.add(new RessourceInformation(
"android.R.drawable.screen_background_dark_transparent",
android.R.drawable.screen_background_dark_transparent));
ressourcesInformation.add(new RessourceInformation(
"android.R.drawable.screen_background_light",
android.R.drawable.screen_background_light));
ressourcesInformation.add(new RessourceInformation(
"android.R.drawable.screen_background_light_transparent",
android.R.drawable.screen_background_light_transparent));
ressourcesInformation.add(new RessourceInformation(
"android.R.drawable.spinner_background",
android.R.drawable.spinner_background));
ressourcesInformation.add(new RessourceInformation(
"android.R.drawable.spinner_dropdown_background",
android.R.drawable.spinner_dropdown_background));
ressourcesInformation.add(new RessourceInformation(
"android.R.drawable.star_big_off",
android.R.drawable.star_big_off));
ressourcesInformation.add(new RessourceInformation(
"android.R.drawable.star_big_on",
android.R.drawable.star_big_on));
ressourcesInformation.add(new RessourceInformation(
"android.R.drawable.star_off",
android.R.drawable.star_off));
ressourcesInformation.add(new RessourceInformation(
"android.R.drawable.star_on",
android.R.drawable.star_on));
ressourcesInformation.add(new RessourceInformation(
"android.R.drawable.stat_notify_call_mute",
android.R.drawable.stat_notify_call_mute));
ressourcesInformation.add(new RessourceInformation(
"android.R.drawable.stat_notify_chat",
android.R.drawable.stat_notify_chat));
ressourcesInformation.add(new RessourceInformation(
"android.R.drawable.stat_notify_error",
android.R.drawable.stat_notify_error));
ressourcesInformation.add(new RessourceInformation(
"android.R.drawable.stat_notify_missed_call",
android.R.drawable.stat_notify_missed_call));
ressourcesInformation.add(new RessourceInformation(
"android.R.drawable.stat_notify_more",
android.R.drawable.stat_notify_more));
ressourcesInformation.add(new RessourceInformation(
"android.R.drawable.stat_notify_sdcard",
android.R.drawable.stat_notify_sdcard));
ressourcesInformation.add(new RessourceInformation(
"android.R.drawable.stat_notify_sdcard_prepare",
android.R.drawable.stat_notify_sdcard_prepare));
ressourcesInformation.add(new RessourceInformation(
"android.R.drawable.stat_notify_sdcard_usb",
android.R.drawable.stat_notify_sdcard_usb));
ressourcesInformation.add(new RessourceInformation(
"android.R.drawable.stat_notify_sync",
android.R.drawable.stat_notify_sync));
ressourcesInformation.add(new RessourceInformation(
"android.R.drawable.stat_notify_sync_noanim",
android.R.drawable.stat_notify_sync_noanim));
ressourcesInformation.add(new RessourceInformation(
"android.R.drawable.stat_notify_voicemail",
android.R.drawable.stat_notify_voicemail));
ressourcesInformation.add(new RessourceInformation(
"android.R.drawable.stat_sys_data_bluetooth",
android.R.drawable.stat_sys_data_bluetooth));
ressourcesInformation.add(new RessourceInformation(
"android.R.drawable.stat_sys_download",
android.R.drawable.stat_sys_download));
ressourcesInformation.add(new RessourceInformation(
"android.R.drawable.stat_sys_download_done",
android.R.drawable.stat_sys_download_done));
ressourcesInformation.add(new RessourceInformation(
"android.R.drawable.stat_sys_headset",
android.R.drawable.stat_sys_headset));
ressourcesInformation.add(new RessourceInformation(
"android.R.drawable.stat_sys_phone_call",
android.R.drawable.stat_sys_phone_call));
ressourcesInformation.add(new RessourceInformation(
"android.R.drawable.stat_sys_phone_call_forward",
android.R.drawable.stat_sys_phone_call_forward));
ressourcesInformation.add(new RessourceInformation(
"android.R.drawable.stat_sys_phone_call_on_hold",
android.R.drawable.stat_sys_phone_call_on_hold));
ressourcesInformation.add(new RessourceInformation(
"android.R.drawable.stat_sys_speakerphone",
android.R.drawable.stat_sys_speakerphone));
ressourcesInformation.add(new RessourceInformation(
"android.R.drawable.stat_sys_upload",
android.R.drawable.stat_sys_upload));
ressourcesInformation.add(new RessourceInformation(
"android.R.drawable.stat_sys_upload_done",
android.R.drawable.stat_sys_upload_done));
ressourcesInformation.add(new RessourceInformation(
"android.R.drawable.stat_sys_vp_phone_call",
android.R.drawable.stat_sys_vp_phone_call));
ressourcesInformation.add(new RessourceInformation(
"android.R.drawable.stat_sys_vp_phone_call_on_hold",
android.R.drawable.stat_sys_vp_phone_call_on_hold));
ressourcesInformation.add(new RessourceInformation(
"android.R.drawable.stat_sys_warning",
android.R.drawable.stat_sys_warning));
ressourcesInformation.add(new RessourceInformation(
"android.R.drawable.status_bar_item_app_background",
android.R.drawable.status_bar_item_app_background));
ressourcesInformation.add(new RessourceInformation(
"android.R.drawable.status_bar_item_background",
android.R.drawable.status_bar_item_background));
ressourcesInformation.add(new RessourceInformation(
"android.R.drawable.sym_action_call",
android.R.drawable.sym_action_call));
ressourcesInformation.add(new RessourceInformation(
"android.R.drawable.sym_action_chat",
android.R.drawable.sym_action_chat));
ressourcesInformation.add(new RessourceInformation(
"android.R.drawable.sym_action_email",
android.R.drawable.sym_action_email));
ressourcesInformation.add(new RessourceInformation(
"android.R.drawable.sym_call_incoming",
android.R.drawable.sym_call_incoming));
ressourcesInformation.add(new RessourceInformation(
"android.R.drawable.sym_call_missed",
android.R.drawable.sym_call_missed));
ressourcesInformation.add(new RessourceInformation(
"android.R.drawable.sym_call_outgoing",
android.R.drawable.sym_call_outgoing));
ressourcesInformation.add(new RessourceInformation(
"android.R.drawable.sym_contact_card",
android.R.drawable.sym_contact_card));
ressourcesInformation.add(new RessourceInformation(
"android.R.drawable.sym_def_app_icon",
android.R.drawable.sym_def_app_icon));
ressourcesInformation.add(new RessourceInformation(
"android.R.drawable.title_bar",
android.R.drawable.title_bar));
ressourcesInformation.add(new RessourceInformation(
"android.R.drawable.title_bar_tall",
android.R.drawable.title_bar_tall));
ressourcesInformation.add(new RessourceInformation(
"android.R.drawable.toast_frame",
android.R.drawable.toast_frame));
ressourcesInformation.add(new RessourceInformation(
"android.R.drawable.zoom_plate",
android.R.drawable.zoom_plate));
}
}
Gestion du clique
Il est généralement intéressant de permettre à l’utilisateur d’appuyer sur une cellule d’une liste afin d’effectuer une action. Pour permettre de gérer le clique sur une cellule, nous allons ajouter un événement dans le « ViewHolder » qui permettra de créer une méthode de clique pour chaque cellule de la liste. Voici la classe « RessourceImageHolder.java » après modification:
import android.view.View;
import android.widget.ImageView;
import android.widget.TextView;

import androidx.recyclerview.widget.RecyclerView;

public class RessourceImageHolder extends RecyclerView.ViewHolder implements View.OnClickListener {

    private TextView ressourceTexteView;

    public TextView getRessourceTexteView() {
        return ressourceTexteView;
    }

    private ImageView ressourceImageView;

    public ImageView getRessourceImageView() {
        return ressourceImageView;
    }

    private String texte;

    public String getTexte() {
        return texte;
    }

    public void setTexte(String aTexte) {
        texte = aTexte;
    }

    public RessourceImageHolder(View aVue) {
        super(aVue);
        ressourceImageView = aVue.findViewById(R.id.ressource_image);
        ressourceTexteView = aVue.findViewById(R.id.ressource_texte);
        texte = "";
        aVue.setOnClickListener(this);
    }

    @Override
    public void onClick(View aVue) {
        Toast lToast = Toast.makeText(aVue.getContext(), texte, Toast.LENGTH_LONG);
        lToast.show();
    }
}
Il est important de remarquer que la classe implémente maintenant « View.OnClickListener », ce qui permettra de l’utiliser comme « ClickListener ». Remarquez également que j’ai ajouté un attribut « texte » contenant le texte à afficher dans le « Toast » du clique. Bien entendu, ce n’est qu’un exemple. Dans votre cas, vous devrez trouver la mécanique requise pour effectuer l’action que vous désirez effectuer. Toute la magie se fait dans le constructeur à la ligne:
aVue.setOnClickListener(this);
Cette ligne fait en sorte que lorsque la vue (dans ce cas-ci, le « layout » de la cellule) recevra un clique, elle devra lancer la méthode « onClick » contenue dans l’objet en cours.
Il faut également comprendre qu’en ajoutant un attribut « texte » au « ViewHolder », je dois m’assurer d’assigner cet attribut dans la méthode « onBindViewHolder » de l’adaptateur:
    @Override
    public void onBindViewHolder(RessourceImageHolder aHolder, int aIndex) {
        aHolder.getRessourceTexteView().setText(ressourcesInformation.get(aIndex).getTexte());
        aHolder.getRessourceImageView().setImageResource(ressourcesInformation.get(aIndex).getId());
        aHolder.setTexte(ressourcesInformation.get(aIndex).getTexte());
    }
Auteur: Louis Marchand

Sauf pour les sections spécifiées autrement, ce travail est sous licence Creative Commons Attribution 4.0 International.